Air Flow Sizing Recommendations

How to size your WHF

We are often asked what kind of results can be expected when using a Whole House Fan, and/or what size fan should someone get based on their house size. The truth is, there are a bunch of factors to consider and no one size fits all answer – read on for things to consider when shopping for an AirScape Whole House Fan.

  • Climate – Do you live in an arid or humid climate? High elevation where it cools off quickly or a lower elevation where the heat stays longer into the night? Humid climates need more airflow to feel cool, and won’t cool down as quickly at night.
  • House size – Square Footage X Ceiling Height – How much volume of air needs to get moved through the house? High ceilings add a lot of air to the house that takes longer to move out of the structure so you want to take that into account in your airflow calculation.
  • Insulation level/tightness of the house – Good insulation will take the house longer to heat up, but once the materials are warm, it takes a lot longer to cool down. Good insulation will need to be cooled nightly or will have trouble releasing the heat. If the attic/walls/ insulation/etc. are still warm in the morning, the house will heat up again once the fan is off. If you have very little insulation, you will be able to cool your house quickly, but it will heat up quickly the following day. The best combination is a lot of insulation with a well vented attic and a whole house fan, so the structure can be properly cooled every night.
  • Personal comfort level – Do you live in a warm climate and rely heavily on A/C throughout the warm season? Do you currently sleep with windows open even if it is warmer than ideal outside for the fresh air, or because it cools off throughout the night? These 2 styles will need much different airflow in order to be happy with the results.
  • Personal security – Are you comfortable opening a few windows throughout the night or only before going to bed and after you are up in the morning? Ideally you want to run the fan as long and as low as possible. All night is best to really pull out all the stored heat from the structure. If you can’t do that, you’ll want a lot more airflow to feel the cooler air faster when you can run it.

Every house and micro-climate is different, and you know yours better than anyone. Once you know what to keep in mind, you can calculate your house volume and look at the recommendations for airflow:

Air Flow Recommendation Ranges*

First, calculate the volume of air in your house.
SQ ft x Avg Ceiling Height = approx volume of air in the house (ex: 1500sf x 8 = 12000cf)

Then, divide that by the cfm of the fan to get the time it takes to complete 1 full air exchange.
(ex: 12000cf / 1700 cfm = 7min air exchanges on high speed of 1700 WHF)

Or, divide it by the desired airflow (see below) to find out the cfm needed to achieve results.
(ex: 12000cf / 5 min = 2400cfm)

Here are the ranges I have found to be effective assuming your home has adequate insulation and is relatively airtight to store the cool air from the previous night through the next day:

3-4min = “Pull the hat off your head.” Moves air fast enough to dry the skin in a humid climate.

4-6min = Eliminate A/C in a dry climate – moves air fast enough to simulate the 68-70 degree consistent climate produced by A/C in a moderate, arid climate.

6-8min = Great airflow, esp. for the West Coast. You will not be able to run the fan until after it cools off in the evening, but it should only take 2-3 air exchanges to notice a nice drop in temperature and be comfortable. You can usually still feel a slight breeze depending on how many windows you open and if outside temp is significantly cooler than indoor temp (10 degrees). This is the minimum airflow we generally recommend.

8-10min = Slower air exchanges, but still moves the air fast enough to cool the structure (assuming the outside air is cool). Likely you will not physically feel this air moving over your skin. This can be adequate airflow in mild climates and well sealed houses. Not recommended for people who currently rely heavily on A/C.

10-12min = Usually this can keep ahead of the heat radiating out of the structure, but it will take a while to cool down in the evening and you will not feel any type of breeze or draft over your skin. This is really the bare minimum for airflow. The fan will need to run all night to see efficient cooling. Usually only recommended for people without A/C in mild climates.

AirScape WHF airflows on their highest speed*:
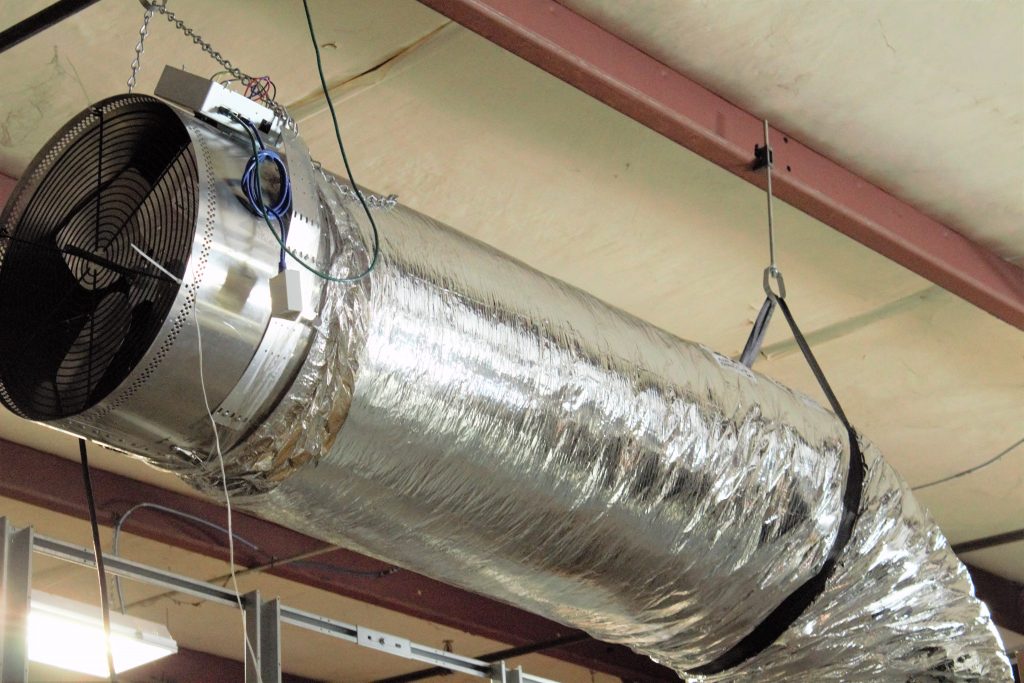
1700 LiftLock / Ventura = 1696 cfm / 1545 cfm
2500 Liftlock/LL Ducted = 2698 cfm / 2276 cfm
3200 Sierra / Ventura = 3253 cfm / 3132 cfm
3400 Sierra / Ventura = 3440 cfm / 3342 cfm
5300 Sierra / Ventura = 3253 cfm / 3132 cfm

*Ideally, choose a fan that has a high speed more than you think you need, so you can use it on the middle speeds, which are more efficient, but you can add air if you want or need to. Our fans all have 10 speeds, so finding one with a middle speed that fits your goals gives you lots of room to handle heat waves and hotter days.

Last, remember to check to make sure you have enough ATTIC VENTING. If you don’t, it is much better to add attic venting than to get a smaller fan.

More questions? Give us a call at 866.448.4187.

We’re happy to talk about your specific needs to find the best Whole House Fan for you.

Whole House Fans vs. Attic Ventilators

What is the difference between a Whole House Fan and an Attic Ventilator? First of all the Whole House Fan is mounted in the attic, while an Attic Ventilator is mounted on the roof or the gable wall of an attic.

The Whole House Fan pulls in cool outside air when you open the windows at night and exhausts the stale, hot air out. It is a natural source of fresh air that saves energy. Because a WHF operates between 2000 CFM and 6000 CFM they quickly exhaust hot indoor air and bring in the cool outside air.

An Attic Ventilator’s purpose is to get hot air out of your attic and bring cool air in. However, it can be pulling that cool air from your house. The fan can depressurize the attic by exhausting air from it, as well. Replacement air comes in either from the outside intake vents or from openings/cracks into the house. The main reason to cool an attic is if you store things in it or have ductwork or HVAC equipment up there. If this is the case, your HVAC equipment and ductwork would better serve you in the interior of your home somewhere, or the insulation should be moved from the attic floor to the sloped roofing of your house.

As you can see the Whole House Fan is designed to cool your home and save you energy while the Attic Ventilator, while good in theory, can actually pull cool air from your home and in turn cost you more in energy.

New Product Development Update

Direct Vent System for Greenhouse and Warehouse Ventilation

Engineers here at AirScape are currently working on the finishing touches of a direct vent exhaust fan designed for industrial and commercial applications such as large indoor greenhouses and warehouses.

The system can be configured for roof or wall exhaust and has automatic Powered AirLock doors. There is an inlet louver with a Powered AirLock so that the space can be sealed up when no exhaust is desired.

Preliminary airflow testing is still incomplete because it outperforms our test chamber’s capacity…  Well over 8500 cfm on only speed 6 (out of 10)! More data to follow as we recalibrate be able to accurately test such high airflow.

For more info, email us at experts@airscapefans.com

Winter Fan Use

Over the past few years we have received a lot of feedback from customers regarding the performance and energy efficiency of our fans during the hot summer months. The only thing lacking is how to use the fan year round. To assist with this we offer the SI (seasonal insulation) kit to help increase the R value of our unit. Lately we have been exploring the idea of getting some use from the fan during the winter. The concept of moving outside temperature air through your home doesn’t have to be limited to cool summer nights. The same technology that can cool your home can also be used to bring heat into your home. Some climates can become warm enough during the day to allow for the air to be brought inside and ultimately warm the house. Using the unit the same way you would at night for cooling during summer, in winter, the unit can be turned on when the temperature outside the home gets at or above the desired temperature inside the home. Creating these air exchanges during the day will help in warming the insulation, foundation, etc. which would otherwise have to be heated by your existing heating system. We want you to get the most out of your Airscape fan, and tips like these really help save money during this time of the year.

http://www.hvacquick.com/products/residential/Grilles-Registers/Access-Doors

For further questions please contact Jeremy Batham, Airscape Technical Support 866-448-4187

PR: Data Monitoring Package

——————————————————————————————————————-

Airscape announces the launch of its new Data Monitoring Package extending the web server capability of its whole house fans.MC-Contact

The data monitoring package “DMP” provides extra sensors and software to allow whole house fan owners to view room, outside, and attic temperatures. Users can view the temperatures through browser enabled devices (smart phones, computers, tablets). Historical data will be aggregated and saved on AirScape servers and available by secure login.


——————————————————————————————————————-

Users can check temperatures in the house, attic, and outside remotely. dmp_package

By looking at the graphs of temperatures, users can view patterns, identify trends, and decide upon the best ways to save utility costs, and optimize green energy efficiencies.

For more information, visit :

http://www.airscapefans.com/learn-about/dmp-explained.php

How to access your Router

Once you’ve ran a CAT5 cable from your 3.5e or 4.4e to your router, you still have some more work to do before you can control your fan through your computer, smartphone or tablet. Since not all of us are Computer Gurus like the AirScape Engineers, (I’m certainly not!), I thought I’d endeavor to figure out what had to be done and break it down into steps for you. Here is a very wordy explanation on how to get access to your router:


Step 1 – Find your Router’s IP Address (192.168.__.__)

***Hint – in most home systems, the router’s IP address is usually going to be something basic, like: 192.168.0.1, 192.168.1.1, 192.168.10.10, 192.168.01.01…

How to find the IP Address:

Windows XP (7 is about the same)

  1. Start
  2. Control Panel
  3. Network and Internet Connections
  4. Network Connections
  5. Local Area Connections
  6. On the left of that window, notice the box labeled Details. Expand if it is minimized and in that box will be a bunch of info including an IP address. That IP address is your router.
  7. Yay! You got the IP address! Now be sure to write it down.

iMac

  1. Open your web browser – Firefox, Safari, etc
  2. Click on the “Firefox” or “Safari” icon in the upper left corner
  3. Preferences
  4. Advanced
  5. For Firefox – Choose Network then Settings – IP address should be listed here
  6. For Safari – Choose Proxies – Change Settings, then click on TCP/IP – IP address listed – then change your default browser – Firefox is WAY better than Safari!

Apple – iPhone/iPad

  1.  Open Settings
  2.  Choose your Network and There it is.


Step 2. Access your Router

1. Type the IP address into your web browser.
2. You will need to put in the user name and password – This is where it gets hard.

The user name and password would have been assigned when the system was originally set up. It may be still set to the manufacturer’s default, but whoever set up your internet should have provided you with the info if they changed it. If you’re like me, and either got it and lost it or never knew it to begin with, you’re going to need to do some detective work to find it out. The password is not the same as your secure network password.

Before getting too involved, look at your router… Turns out my router had the default user name and password printed on it right next to the model #. You may be able to save yourself a lot of extra work by looking at your router BEFORE you do everything written below – learn from my mistakes 🙂

  • If you have the router setup disk – good for you, you’re way more organized than me. Now is the time to pull it out and use it.
  • If not, you can get your model # off your router and go to the manufacturer’s website and fight your way through support sections until you find the info you want, which is either:

1. The default user name and password. We’re hoping in this case that the default manufacturer’s user name and password were never changed.
Or
2. Directions for how to reset your user name and password back to factory settings. *Warning – If you reset a router, all saved information will be lost.

  • If you find the manufacturer’s defaults but they don’t work, you may be able to contact the company that set up your connection. A large company such as Charter, Comcast, etc. may use standard defaults or note on your account what user name and password they gave your router. This is pretty unlikely, but may be the case if you are renting one of their routers. This is worth a try before resetting your router and possibly losing important information.

Ok, you get the idea…

If the manufacturer’s default doesn’t work and/or you can’t figure out how to reset your system, you could always try calling the manufacturer’s Tech Support and begging for help.They may sigh with exasperation, but they can probably help you.

Please note – However you get access to your routers user name and password, if it is still set to default or if you reset it, be sure to change it after all this is over so your network is secure!

3. Once you are “in” to your router, go ahead and follow the instructions on our blog IP Address Reservation to complete the set up.

Good luck., and give us a call at (866) 448-4187 if you have any questions.