UPDATE: The controls referenced below are currently only available as an upgrade on Sierra units. For more information please call us at 866.448.4187.
Below is an email from a customer who has integrated his AirScape 2.5e WHF with the INSTEON home automation system. We love the idea so we are sharing it here with his permission. Many thanks Jeff!
I wanted to let you know that I received my 2.5e WHF last week, installed it over the weekend , and integrated it with my home automation platform in about 30 minutes this morning. I’m really happy with the 2.5e WHF. It’s much, much quieter than my old Tamarack HV1600, and the build quality is appreciably better. But what I like the most is your IP-based control system and DMP! Which leads me to the HA integration, which I’ll try to summarize briefly:
I have an Insteon-based home automation system. If you’re not familiar with Insteon, you can read about it here. In short, it’s a dual-mesh HA network utilizing powerline and RF transmission. Most of the devices on the network are simple relays or dimmers controlling 120V loads (e.g., light switches), but I also have a number of dry contact sensor and relay controls for integrating devices which utilize contact closure, like my Velux skylights, my driveway gate operator, etc.
The Insteon system allows for simple grouping of devices into “scenes,” but to implement more sophisticated automation, you need a programmable controller. There are several products on the market, but I use an ISY-994i which allows me to write simple event-driven programs to control devices on the Insteon network. The ISY also allows me to define network resources (defined as HTTP requests or simple TCP socket protocols) as devices. So for the fan integration, I defined two network resources:
“WHF speed up” = http://whf/fanspd.cgi?dir=1
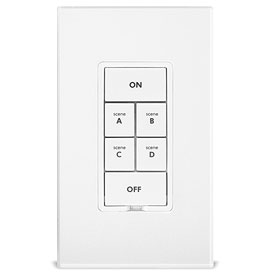
“WHF off” = http://whf/fanspd.cgi?dir=4In my house I have several Insteon keypads, each of which has multiple buttons linked to various Insteon scenes. Here’s what a typical keypad looks like:
The buttons labeled “House fan” and “Fan speed” are associated with two scenes, which not only link all of the other keypads with the same buttons (e.g., entry hallway and master bedroom have equivalent controls), but changing the state of these buttons cause events to “fire” which in turn causes programs to execute.
The “House fan” button toggles between ON and OFF states. When it goes on, a program runs and calls the WHF speed up network resource, which turns the fan on.
When “House fan” button toggles to off, the WHF off network resource is called.
The “Fan speed” button is configured in non-toggle mode, which makes it like a momentary switch. Each press of the button sends an ON command to the group, and causes execution of a program that calls the WHF speed up network resource.
I have a third program which I call “WHF protect” which basically locks out the house fan in the case of air conditioning or heating running, and a few other conditions.
So for a simple control mechanism, that’s all that’s necessary. In the future I may use the temperature data from the WHF controller as input to control logic (e.g., IF outside temp < inside temp AND windows/skylights open, THEN turn on fan), but for now the system is functional using my existing keypads. In fact I didn’t install your wired control in my wall, but I did remove the PCB and temperature sensor and installed it in a return air vent for the purposes of measuring inside air temperature.
Let me know if you have any questions, and thanks for a great product!
-Jeff Mayzurk