AirScape App for iPhone and iPad now Available.

UPDATE: The controls referenced below are currently only available as an upgrade on Sierra units. For more information please call us at 866.448.4187.

Our app for iPhone® and iPad® is now available from the App Store. We released our app for Android devices about a year ago, and are incredibly excited to offer the same great functionality to our customers with Apple® devices.

With this FREE app, homeowners with AirScape whole house fans can:iOS_Blog_iPhone

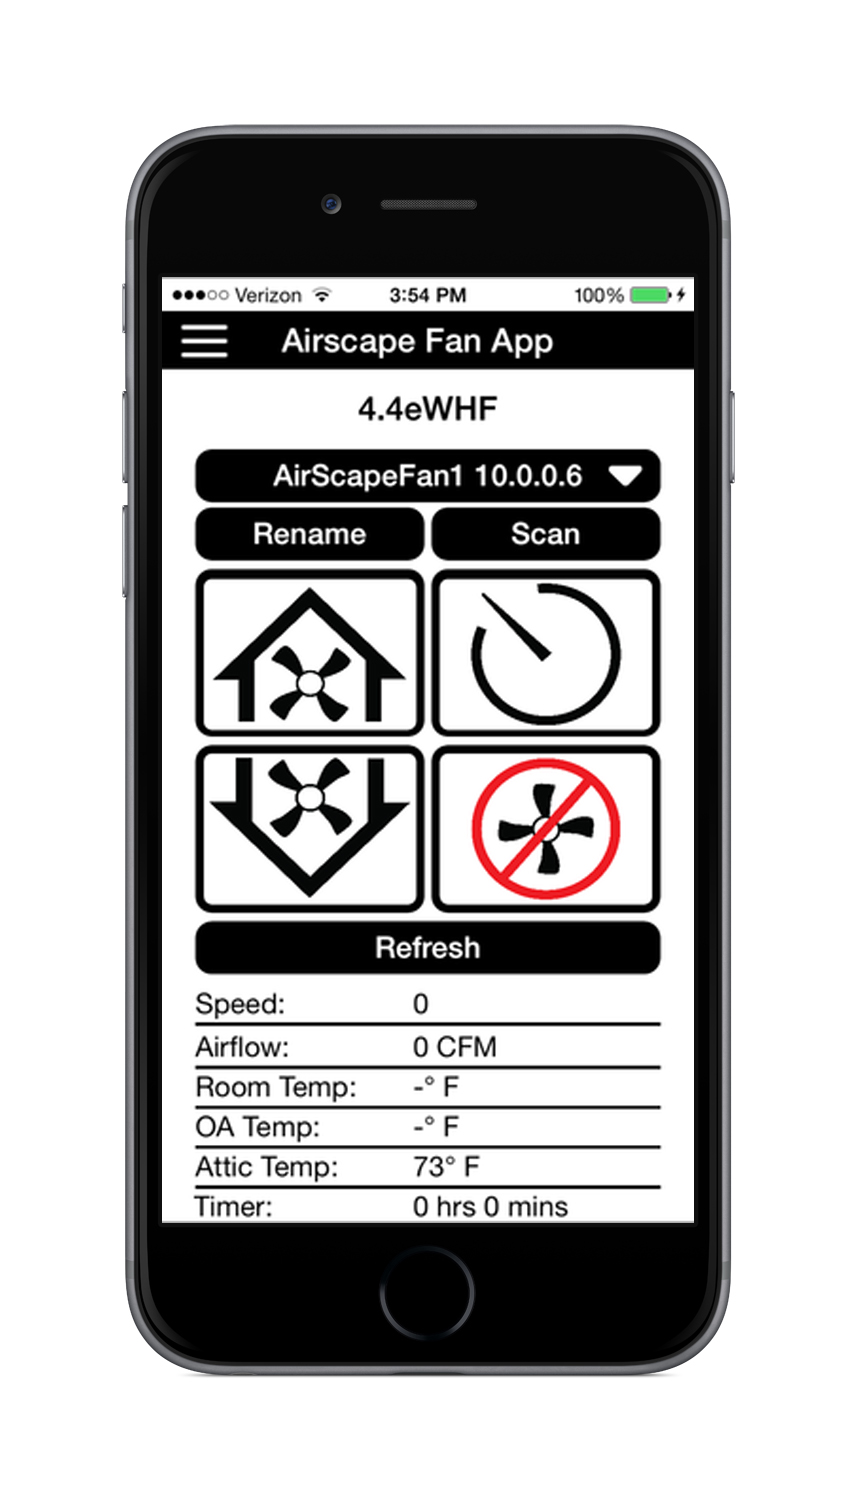
  • Scan their network to find all AirScape whole house fans connected to it;
  • Assign custom names to each fan on the network for easy identification;
  • Control a connected fan through the app’s interface, which is identical to that on our wall switches and wireless remotes; and,
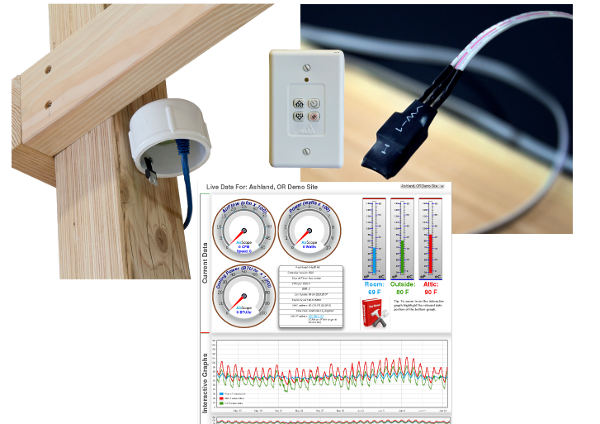
  • View a fan’s status, indoor and attic temperatures, as well as any SafeSpeed™ notifications if this accessory has been installed.

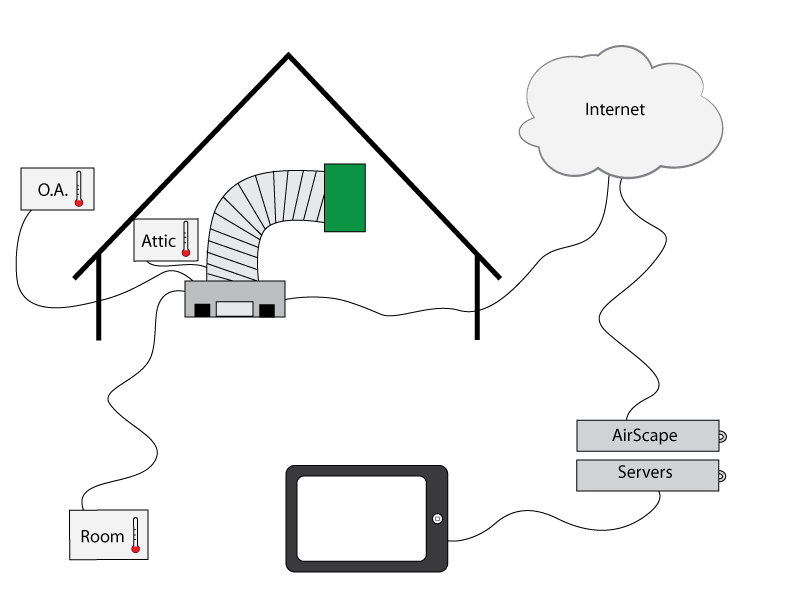
To operate a fan using this app, both your fan and iPhone or iPad need to be connected to the same local area network (“LAN”)—your fan using a CAT-5 cable between its control box and your router, and your iPhone or iPad using Wi-Fi. For safety purposes this app cannot operate fans over the internet or your cellular network. If, for example, you’ve got access to the internet using your local coffee shop’s network or your phone’s 3G/4G service, our app will not be able to connect to your home’s fan.

Fans that are not connected to a network cannot be controlled using this app. Also, this app is compatible with only AirScape whole house fans with 2nd generation controls (sold 2013 to present).

Apple_AppStore_Badge

INSTEON Integration with Gen 2 Controls

UPDATE: The controls referenced below are currently only available as an upgrade on Sierra units. For more information please call us at 866.448.4187.

Below is an email from a customer who has integrated his AirScape 2.5e WHF with the INSTEON home automation system.  We love the idea so we are sharing it here with his permission.  Many thanks Jeff!

I wanted to let you know that I received my 2.5e WHF last week, installed it over the weekend , and integrated it with my home automation platform in about 30 minutes this morning. I’m really happy with the 2.5e WHF. It’s much, much quieter than my old Tamarack HV1600, and the build quality is appreciably better. But what I like the most is your IP-based control system and DMP! Which leads me to the HA integration, which I’ll try to summarize briefly:

I have an Insteon-based home automation system. If you’re not familiar with Insteon, you can read about it here. In short, it’s a dual-mesh HA network utilizing powerline and RF transmission. Most of the devices on the network are simple relays or dimmers controlling 120V loads (e.g., light switches), but I also have a number of dry contact sensor and relay controls for integrating devices which utilize contact closure, like my Velux skylights, my driveway gate operator, etc.

The Insteon system allows for simple grouping of devices into “scenes,” but to implement more sophisticated automation, you need a programmable controller. There are several products on the market, but I use an ISY-994i which allows me to write simple event-driven programs to control devices on the Insteon network. The ISY also allows me to define network resources (defined as HTTP requests or simple TCP socket protocols) as devices. So for the fan integration, I defined two network resources:

“WHF speed up”  =  http://whf/fanspd.cgi?dir=1
“WHF off”  =  http://whf/fanspd.cgi?dir=4

In my house I have several Insteon keypads, each of which has multiple buttons linked to various Insteon scenes. Here’s what a typical keypad looks like:

2334-232

The buttons labeled “House fan” and “Fan speed” are associated with two scenes, which not only link all of the other keypads with the same buttons (e.g., entry hallway and master bedroom have equivalent controls), but changing the state of these buttons cause events to “fire” which in turn causes programs to execute.

The “House fan” button toggles between ON and OFF states. When it goes on, a program runs and calls the WHF speed up network resource, which turns the fan on.

When “House fan” button toggles to off, the WHF off network resource is called.

The “Fan speed” button is configured in non-toggle mode, which makes it like a momentary switch. Each press of the button sends an ON command to the group, and causes execution of a program that calls the WHF speed up network resource.

I have a third program which I call “WHF protect” which basically locks out the house fan in the case of air conditioning or heating running, and a few other conditions.

So for a simple control mechanism, that’s all that’s necessary. In the future I may use the temperature data from the WHF controller as input to control logic (e.g., IF outside temp < inside temp AND windows/skylights open, THEN turn on fan), but for now the system is functional using my existing keypads. In fact I didn’t install your wired control in my wall, but I did remove the PCB and temperature sensor and installed it in a return air vent for the purposes of measuring inside air temperature.

Let me know if you have any questions, and thanks for a great product!

-Jeff Mayzurk

Gen 2 Controls API

UPDATE: The controls referenced below are currently only available as an upgrade on Sierra units. For more information please call us at 866.448.4187.

We have recently seen some very cool and imaginative integrations of the AirScape 2nd Gen Controls into home and building automation systems.  Frankly, we could not be happier as this was the intent of introducing network enabled fans like ours.  To help with future integration ideas, here is more info on how our controls communicate.

The API (application programming interface) for our whole house fan web server is very simple.  Its essentially an HTTP command sent to the controller.

http://controllerURL/fanspd.cgi?dir=|1|2|3|4|
where 1=fan speed up, 2=timer hour add, 3=fan speed down, 4=fan off

For example, if you want to turn OFF a fan at IP 192.168.0.20 the command would be:

http://192.168.0.20/fanspd.cgi?dir=4

When you send an API command, you also get an xml data stream back from the controller.

————–Example of xml data ——————

fanspd<fanspd>0</fanspd>
doorinprocess<doorinprocess>0</doorinprocess>
timeremaining<timeremaining>0</timeremaining>
macaddr<macaddr>60:CB:FB:99:99:0A</macaddr>
ipaddr<ipaddr>192.168.0.20</ipaddr>
model<model>2.5eWHF</model>
softver: <softver>2.14.1</softver>
interlock1:<interlock1>0</interlock1>
interlock2: <interlock2>0</interlock2>
cfm: <cfm>0</cfm>
power: <power>0</power>
inside:<house_temp>72</house_temp>
<DNS1>192.168.0.1</DNS1>
attic: <attic_temp>92</attic_temp>
OA: <oa_temp>81</oa_temp>
server response: <server_response>Posted
OK<br/></server_response>
DIP Switches: <DIPS>00000</DIPS>
Remote Switch:<switch2>1111</switch2>
Setpoint:<Setpoint>0</Setpoint>

——————————————————–

If you want to get data from the controller without any control actions, you can send the same HTTP command string without the “?dir=|1|2|3|4|” suffix.

For example, if your fan is at IP 192.168.0.20 the command would be:

http://192.168.0.20/fanspd.cgi

For XML and JSON formatted responses use the following commands with your fan IP inserted:

http://192.168.0.20/status.xml.cgi  gives data in xml format
http://192.168.0.20/status.json.cgi  gives data in json format

As always, if you have any questions on the API or want to brainstorm about your integration call us at 866.448.4187 or email experts@airscapefans.com

Bookmark your WHF controller

UPDATE: The controls referenced below are currently only available as an upgrade on Sierra units. For more information please call us at 866.448.4187.

There are a couple of ways of quickly accessing your whole house fan controller through a web browser.

A bit of technical background:

Your AirScape WHF gets an IP address (something like 192.168.xxx.xxx) from your router through a process called DHCP.  This IP address stays the same for long periods, but  may change because of power failures, unit resets, etc. For convenience we don’t want to have to look for that IP address or URL whenever we want to change fan speeds or set the timer.

Method 1: Fix the IP address or set an IP address reservation

  • Follow the instructions to reserve or fix an IP address as described in https://blog.airscapefans.com/archives/ip-address-reservation
  • Put the IP address into your browser URL window
  • Save that page as a Bookmark

Method 2: Use the AirScape server to find your IP address

  • You need to be signed up for the AirScape Data Monitoring. (Call us to set this up)
  • Make a bookmark on your browser with the address as follows: http://airscapefans.com/control/local-link.php?mac=:last-6-characters-of-your-MAC . You can find the ‘last-6-characters-of-your-MAC” on the sticker of your WHF control panel. This one (pictured below) has a MAC address of 60:CB:FB:00:00:17.
  • The bookmark for this example would be: http://airscapefans.com/control/local-link.php?mac=000017
  • This will only work when you are connected to your LAN (local area network). So if your smart phone is not connected to your home LAN, it won’t work.

dhcp-3

Whole House Fan Monitoring

monitoring-line-drawing

What ? The  data monitoring package “DMP” is a new feature available for AirScape whole house fans. This package of extra sensors and software allows whole house fan owners to view room, outside, and attic temperatures. Users can view the temperatures through their browser enabled devices (smart phones, computers, tablets …). Historical data will be saved on AirScape servers and will only be available by secure login.

Why is this cool ? You will be able to check temperatures in your house, attic, and outside remotely. By looking at the graphs of temperatures, you’ll be able to decide on the best ways to save utility costs. Upcoming software will be able to total your annual energy savings.

When? Available in the next 2 weeks on select models.

Cost ?  The additional cost for the 3 temperature sensors (accurate to 1 deg F) and additional embedded software will be $49. Monitoring and web access: FREE

Privacy ? Your data  will only be available to you, secured by encrypted passwords. Aggregated data that does not reveal the user’s identity may be used for research purposes.

Want to see more about how it works? Check out the DMP DEMO PAGE

monitoring-package

IP address reservation

UPDATE: The controls referenced below are currently only available as an upgrade on Sierra units. For more information please call us at 866.448.4187.

This applies to our 2nd Generation controls (shipping with 3.5eWHF and 4.4eWHF models as of July 2012) that are connected to a home network (LAN).

Every device that communicates with an IP (internet protocol) network will have an IP address (local area network addresses will often be something like 192.168.xxx.xxx) and a MAC address. MAC addresses are the serial numbers of the internet and are registered with the IEEE (institute of electrical and electronics engineers). AirScape has a block of MAC addresses that will always be of the form 60:CB:FB:xx:xx:xx . This makes it very easy to find and identify your AirScape whole house fan when it’s on your network.

The AirScape control board gets its IP address from your router through a process called DHCP (dynamic host control protocol).  When your router senses that a new device is connected, it assigns an IP address to that device. (It know that the device is ‘new” by its MAC address – every MAC address is different).

Now, here is the whole point of the IP address reservation. A DHCP assigned IP address can and will change, but we want a fixed address.  The IP address reservation provides the best of both worlds. There is no IP address configuration at the device. The router will recognize that device by its MAC address and then assign it the same IP address each time.

The following example and screenshots are of a D-link DIR-825 router.

Note the AirScape MAC address

It’s marked on the electrical box cover and in this case, it’s 60:CB:FB:00:00:17

Add DHCP Reservation

We can pick any IP address within the LAN range (192.168.0.1 to 192.168.10.255) with the exception of already used addresses. In this case, we are selecting 192.168.0.13

Confirm DHCP Reservation

 Confirm Web Server Operation

Enter the IP address ( 192.168.0.13) into your browser – computer or smartphone.